

Salesforce Marketing Cloud has some brilliant Einstein features that provide “insights and data” to inform the “content and timing” of your marketing activities. Using the powerful artificial intelligence (AI) features, businesses can understand their customers’ engagement and behavior so every interaction can be personalized.
Einstein features are by default included with Corporate and Enterprise Edition or also available as an add on purchase to Pro Edition. Using this article, learn how to activate and leverage its capabilities. The Einstein features provided by Salesforce Marketing Cloud are:
- Einstein Engagement Scoring
- Einstein Messaging Insights
- Einstein Send Time Optimization
- Einstein Engagement Frequency
- Einstein Copy Insights
- Einstein Content Selection
- Einstein Email Recommendations
- Einstein Web Recommendations
- Einstein Content Tagging
In Marketing Cloud, all Einstein features can be accessed from the Einstein Tab in the Navigation bar. If any of these are missing in your Navigation bar implies that they are not available in your SFMC Edition as per your license. Contact your Salesforce Account Executive to purchase the add ons. 
1. Einstein Engagement Scoring
Einstein Engagement Scoring feature helps you target customers to maximize engagement and conversions. It uses customer data and machine learning to generate predictive models that assign scores for each subscriber’s likelihood to stay subscribed, open an email, or click links. Segment your subscriber list to identify and target an audience based on how likely they are to engage with your campaign.
Activation
To activate, go to the Einstein tab in the Navigation bar, select ‘Einstein Engagement Scoring’ and click ‘Activate’.
Einstein requires historical subscriber engagement data, including at least 1,000 events in the 90 days before activation. If you are new to Marketing Cloud, the system could take up to 90 days to generate initial scores. Otherwise, scores are typically available 24–48 hours after implementation.
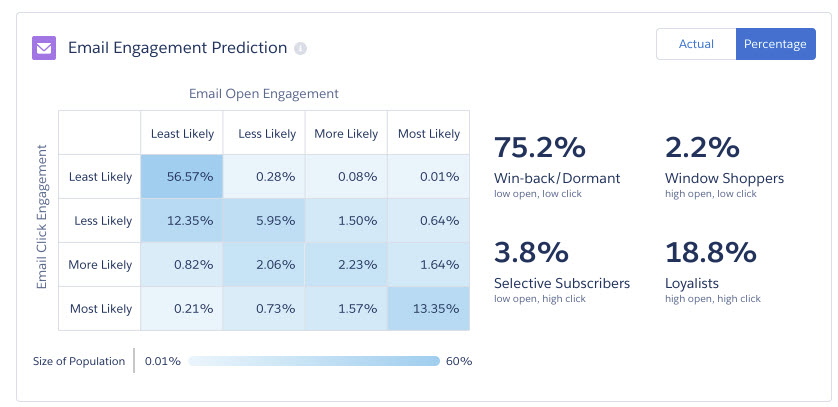
Einstein Engagement Scoring assigns one of four personas to each subscriber, based on their likelihood to open an email or click a link in an email. Use these personas to refine customer engagement campaigns and journeys.
- Loyalists: Subscribers with high open and click engagement.
- Window Shoppers: Subscribers with high open and low click engagement.
- Selective Subscribers: Subscribers with low open and high click engagement.
- Winback/Dormant: Subscribers with low open and click engagement.
 Einstein Engagement Scoring populates a data extension ‘MC_Einstein_Predictive_Scores’ located in the JourneyIQ folder.
Create Audience
Audience Builder offers pre-built Einstein Engagement Scoring dimensions to quickly and easily apply data science models to personalize your marketing campaigns and customer journeys. In Audience Builder, click ‘Create Audience’, select ‘Einstein Engagement Scoring’ in the attribute library, and ‘Publish’ the audience to use the audience. Use this audience, to run personalized campaigns with these customers.
Engagement Scoring in Journey Builder
The personas can be used in Journey Builder too within a customer journey. Use the ‘Einstein Split’ activity in Journey Builder to segment customers into logical customer journeys based on Einstein Engagement Scoring data. Just drag and drop the Einstein Split activity onto Journey canvas.
There are five Einstein Split options. The first one ‘Persona Split’ is based on the results of Einstein Engagement Scoring. After you select the Persona Split, the split will be based on the 4 Persona Types that are available. Customers follow the path based on their Persona. With this, you will be able to personalize the content and reach your customers through the right channel.
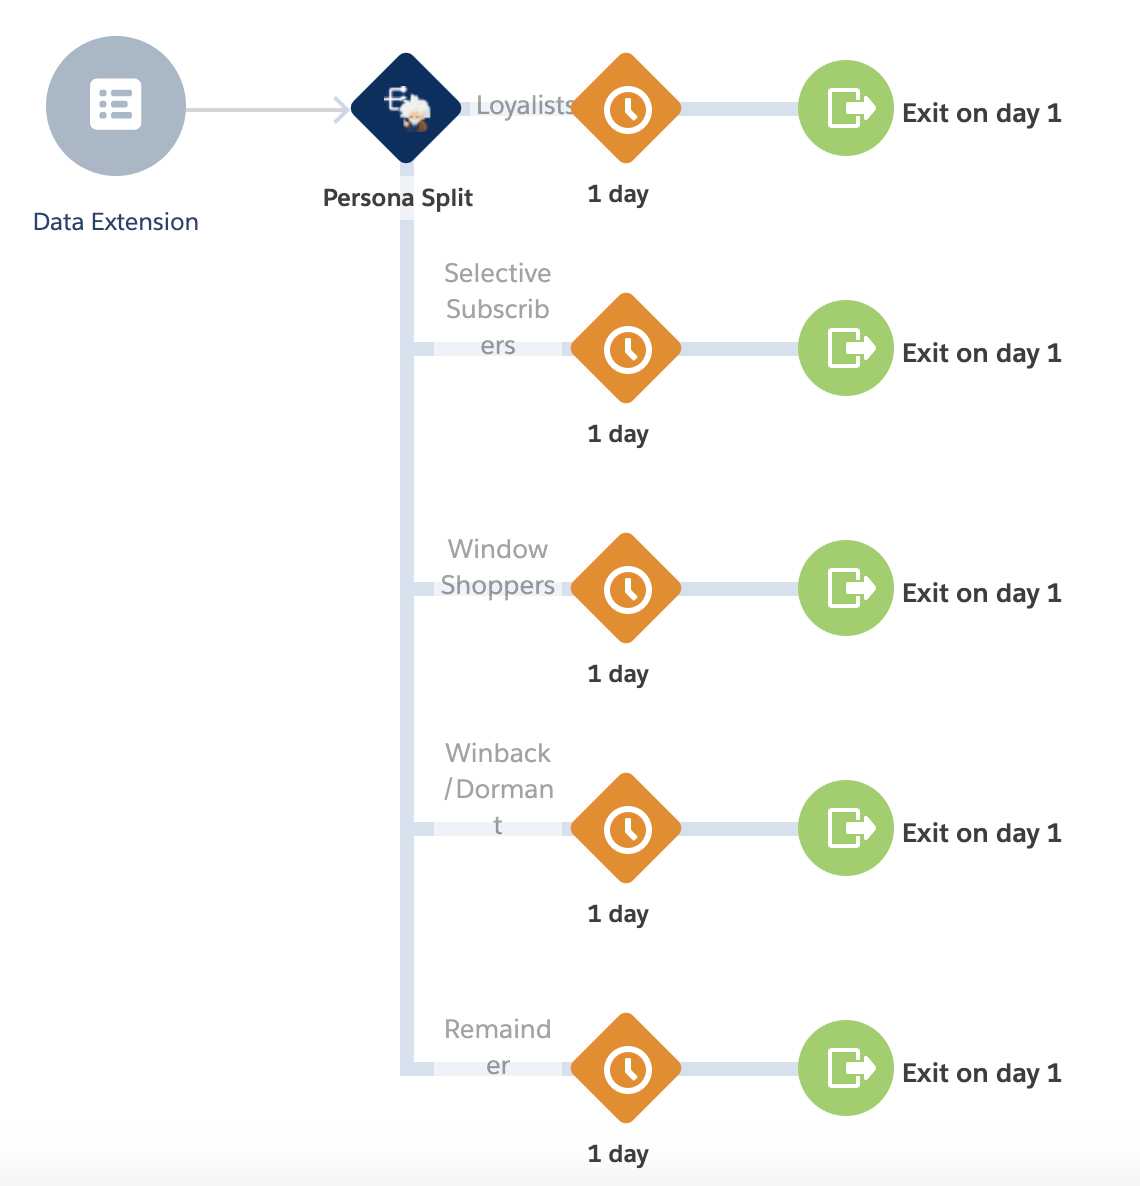
2. Einstein Messaging Insights
Einstein Messaging Insights alert you to any changes in your marketing performance. The Einstein notifications badge appears in the header, where it’s constantly accessible to let you know how your email sends and journeys perform.
- Einstein monitors the Open Rate, Click Rate, and Unsubscribe Rates of your email sends, including batch sends and journey sends.
- When it finds an anomalously high or low result compared to the expected values, it generates an insight.
When an anomaly occurs, the notifications badge alerts you. The notification can be seen at the top right corner in your SFMC account.

Einstein Messaging Insights Dashboard
Clicking on the insight gives more details of the anomaly in the Einstein Messaging Insights Dashboard. The dashboard shows send-related information, such as Job ID, Email Name, Subject, Date Sent, and Total Delivered. It also clearly shows data about each send and the variable that was identified as an anomaly.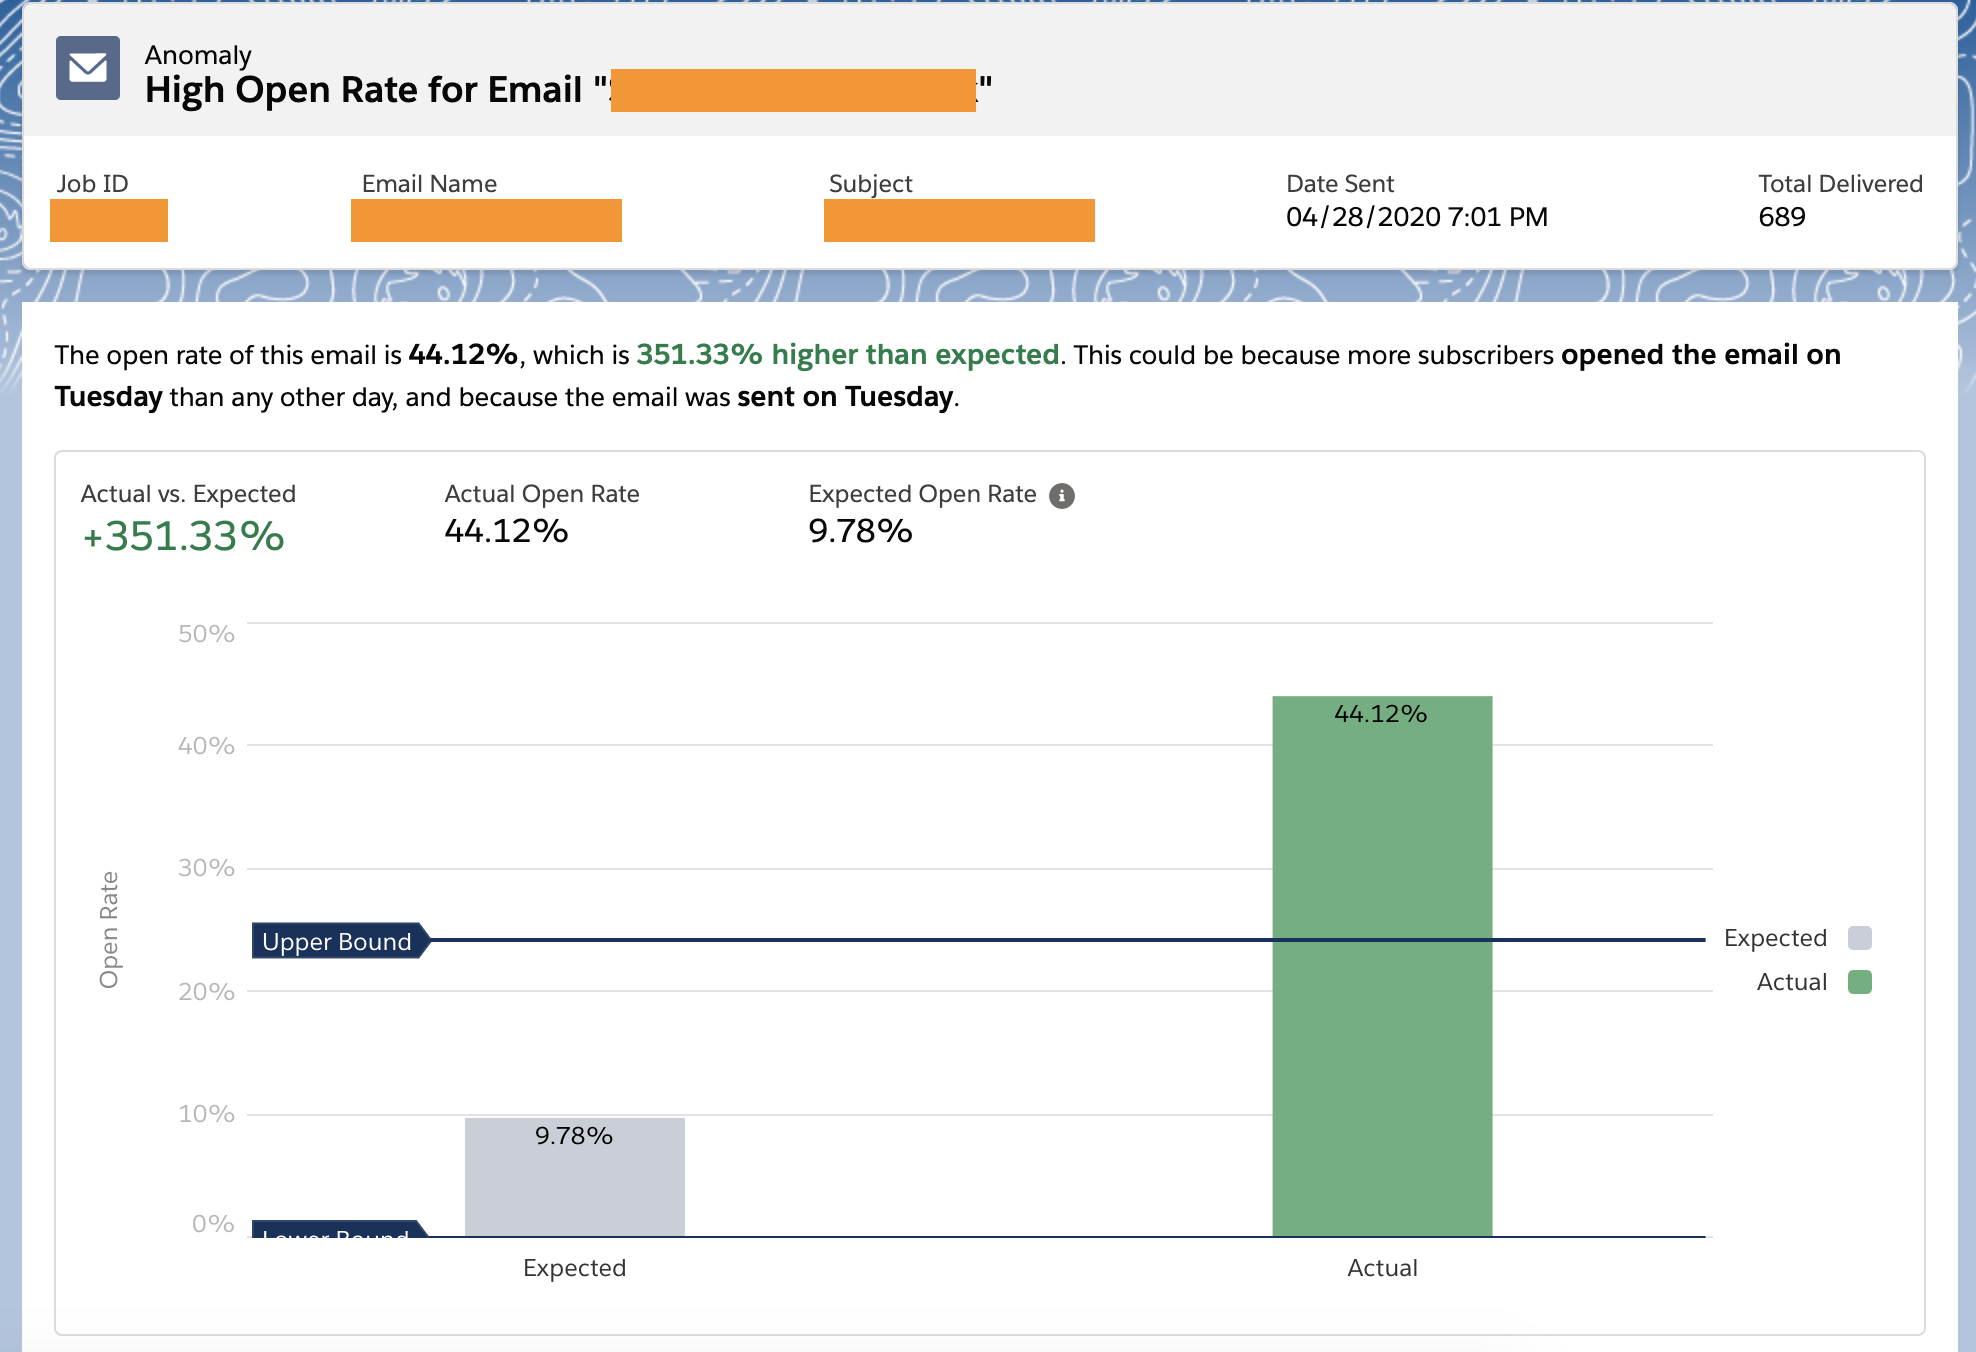 Note:
Note:
- Einstein evaluates each journey and each email send once each day to produce insights.
- Einstein uses the events collected for up to seven days after an email send to reassess whether the send is an anomaly or not.

Activation
It is off by default. To activate
- Navigate to Marketing Cloud Setup.
- Click Einstein.
- Click Einstein Messaging Insights.
- Activate Einstein Messaging Insights for your business unit
In the background, automation is created that moves data to the Marketing Cloud’s Einstein Platform to analyze the data. Einstein Messaging Insights analyze emails that are sent via journeys and batch sends too.
3. Einstein Sent Time Optimization (STO)
Einstein Send Time Optimization (STO) uses machine learning to determine the best time to send a message to your subscriber so that the message is likely to be opened. The best time is determined for each subscriber/contact.
Activation
To activate, go to the Einstein tab in the Navigation bar, select ‘Einstein Engagement Scoring’ and click ‘Activate’. There are 2 features provided by Salesforce as part of the Einstein Send Time Optimization (STO):
- Einstein STO Dashboard
- Einstein STO Journey Builder activity
Einstein STO Dashboard
With the STO Dashboard, you can visualize the optimal predicted send times by the day or hour for all email addresses in an SFMC account or for all contacts in a business unit.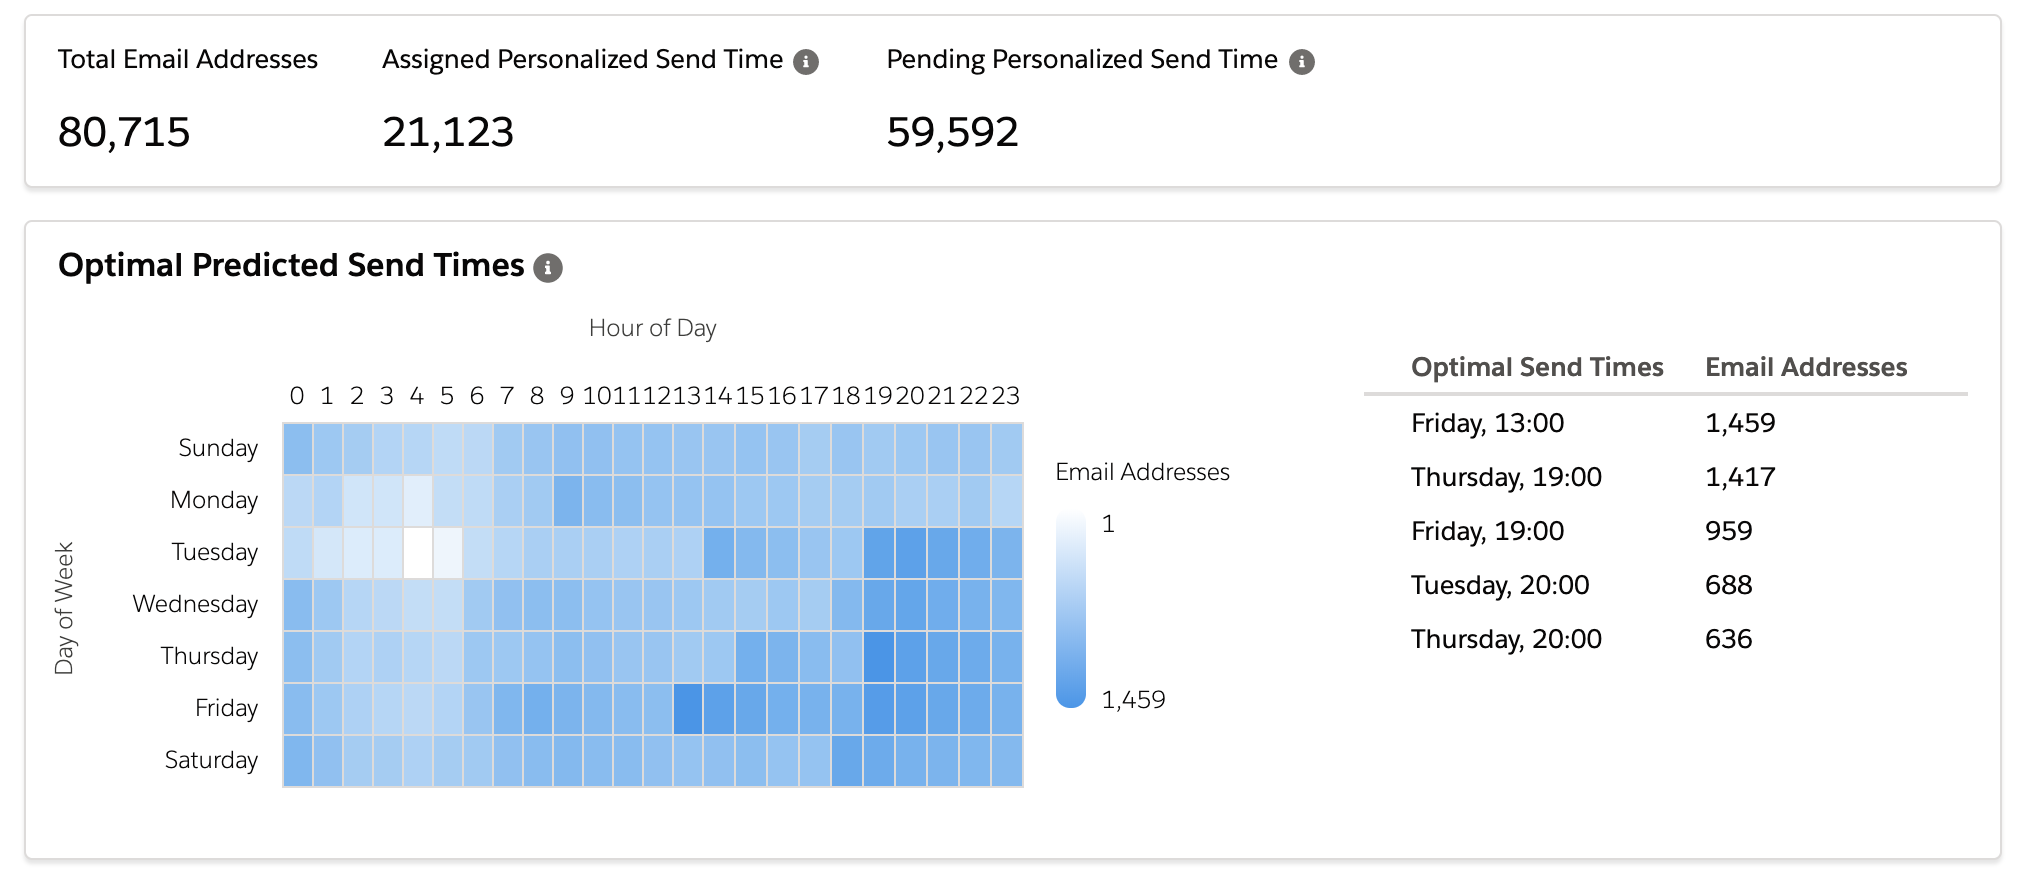 In the above dashboard:
- Assigned Personalized Send Time shows how many contacts or email addresses Einstein can suggest a ‘send time’ for. For these contacts, there’s a specific predicted preferred time that the subscriber is likely to open the email.
- Pending Personalized Send Time shows how many contacts or email addresses Einstein needs more data to suggest a send time for.
- Optimal Predicted Send Times Chart shows the delivery times during the week when email recipients are most likely to open your messages. Einstein assigns a prediction score to each email address. Einstein gives a 0–100 probability score for all 168 hours in a week. The prediction score forecasts the best hour of the week to send to an email address so that a message is opened. The chart aggregates scores so it can show the single hour-day combination with the highest probability to promote opening a message.
- Optimal Send Times: Einstein provides a list of optimal send times, too.

- Optimal Send Times by Day shows the total number of contacts or email addresses that are likely to open a message for each day.
- Optimal Send Times by Hour shows how many contacts or email addresses that are likely to open a message for each hour of the day.
Einstein STO Journey Builder Activity
The Einstein STO Journey Builder activity sends an email to each subscriber at the time when that subscriber is most likely to open the message. The activity is available in Flow Controls in Journey Builder. Drag and drop the “Einstein STO” activity before any Email Activity in the journey flow.

STO should be placed immediately before any Email activity. That email will be sent to the subscriber at the best time the contact is likely to open. If there are multiple emails, in your Journey flow, drag and drop the “Einstein STO” before each and every Email activity.

The minimum Optima Duration you can select is 2 Hours and the maximum is 168 Hours (i.e., 7 full Days). When a contact reaches the activity, Einstein finds the best upcoming hour, starting at the beginning of the subsequent hour, to send your message.
The optimal duration configuration in the journey builder STO activity is important too. Here’s how:
Use Case 1: Your journey is running every day at 10AM. Einstein STO Journey activity Optimal Duration is configured as 24 hours. And you used Einstein STO for every email activity. Let’s say a customer’s optimal time to open is 4PM. When the journey runs at 10AM, the customer reaches the email activity at 10AM but the email won’t be sent at 10AM. The email will be actually be sent at 4PM since the Optimal Duration is configured as 24 hrs, STO checks the best time in these 24 hours (10 AM today to 10 AM next day)
Use Case 2: Journey runs at 10AM. STO Activity is configured as 2 hours. Let’s say a customer’s optimal time to open is 4PM. When the journey runs at 10AM, the customer reaches the email activity at 10AM. Since the STO Activity is configured at only 2 hours, STO checks what’s the best time for that customer to open the email within these 2 hours itself and sends the email between 10AM and 12noon.
4. Einstein Engagement Frequency
Probably the most important and useful insight that Einstein provides for medium to large scale companies that send hundreds of emails to their customers – are the customers oversaturated or undersaturated by the number of emails they receive from your brand? This is a very key metric.
Einstein Engagement Frequency evaluates your email activities and identifies the optimum number of email messages to send. This feature also identifies subscribers who received too many or not enough email messages. To engage your subscribers with the correct number of email messages, follow these frequency suggestions.
Activation
To activate the feature:
- Click Einstein.Click Einstein Engagement Frequency.
- Click Activate Einstein Engagement Frequency.
The activation process requires up to 72 hours to complete.
Einstein Frequency Suggestions Cards
The Einstein Frequency Suggestions card identifies the suggested frequency range for your email activities. In the below,
- The card on the left suggests sending 7 emails over 90 days and that could also increase the open rate by 30.99%.
- Another card on the right shows the percentages of the subscriber population that received too many or too few email messages (oversaturated or undersaturated).

Email Frequency Chart
Email Frequency chart shows the data based on the dates chosen for review in the Data Filter card of this app.
- Total number of subscribers that received the specified number of email messages during the specified time period.
- Open rate for the specified number of email messages sent
- Click rate for the specified number of email messages sent
- Unsubscribe rate for the specified number of email messages sent
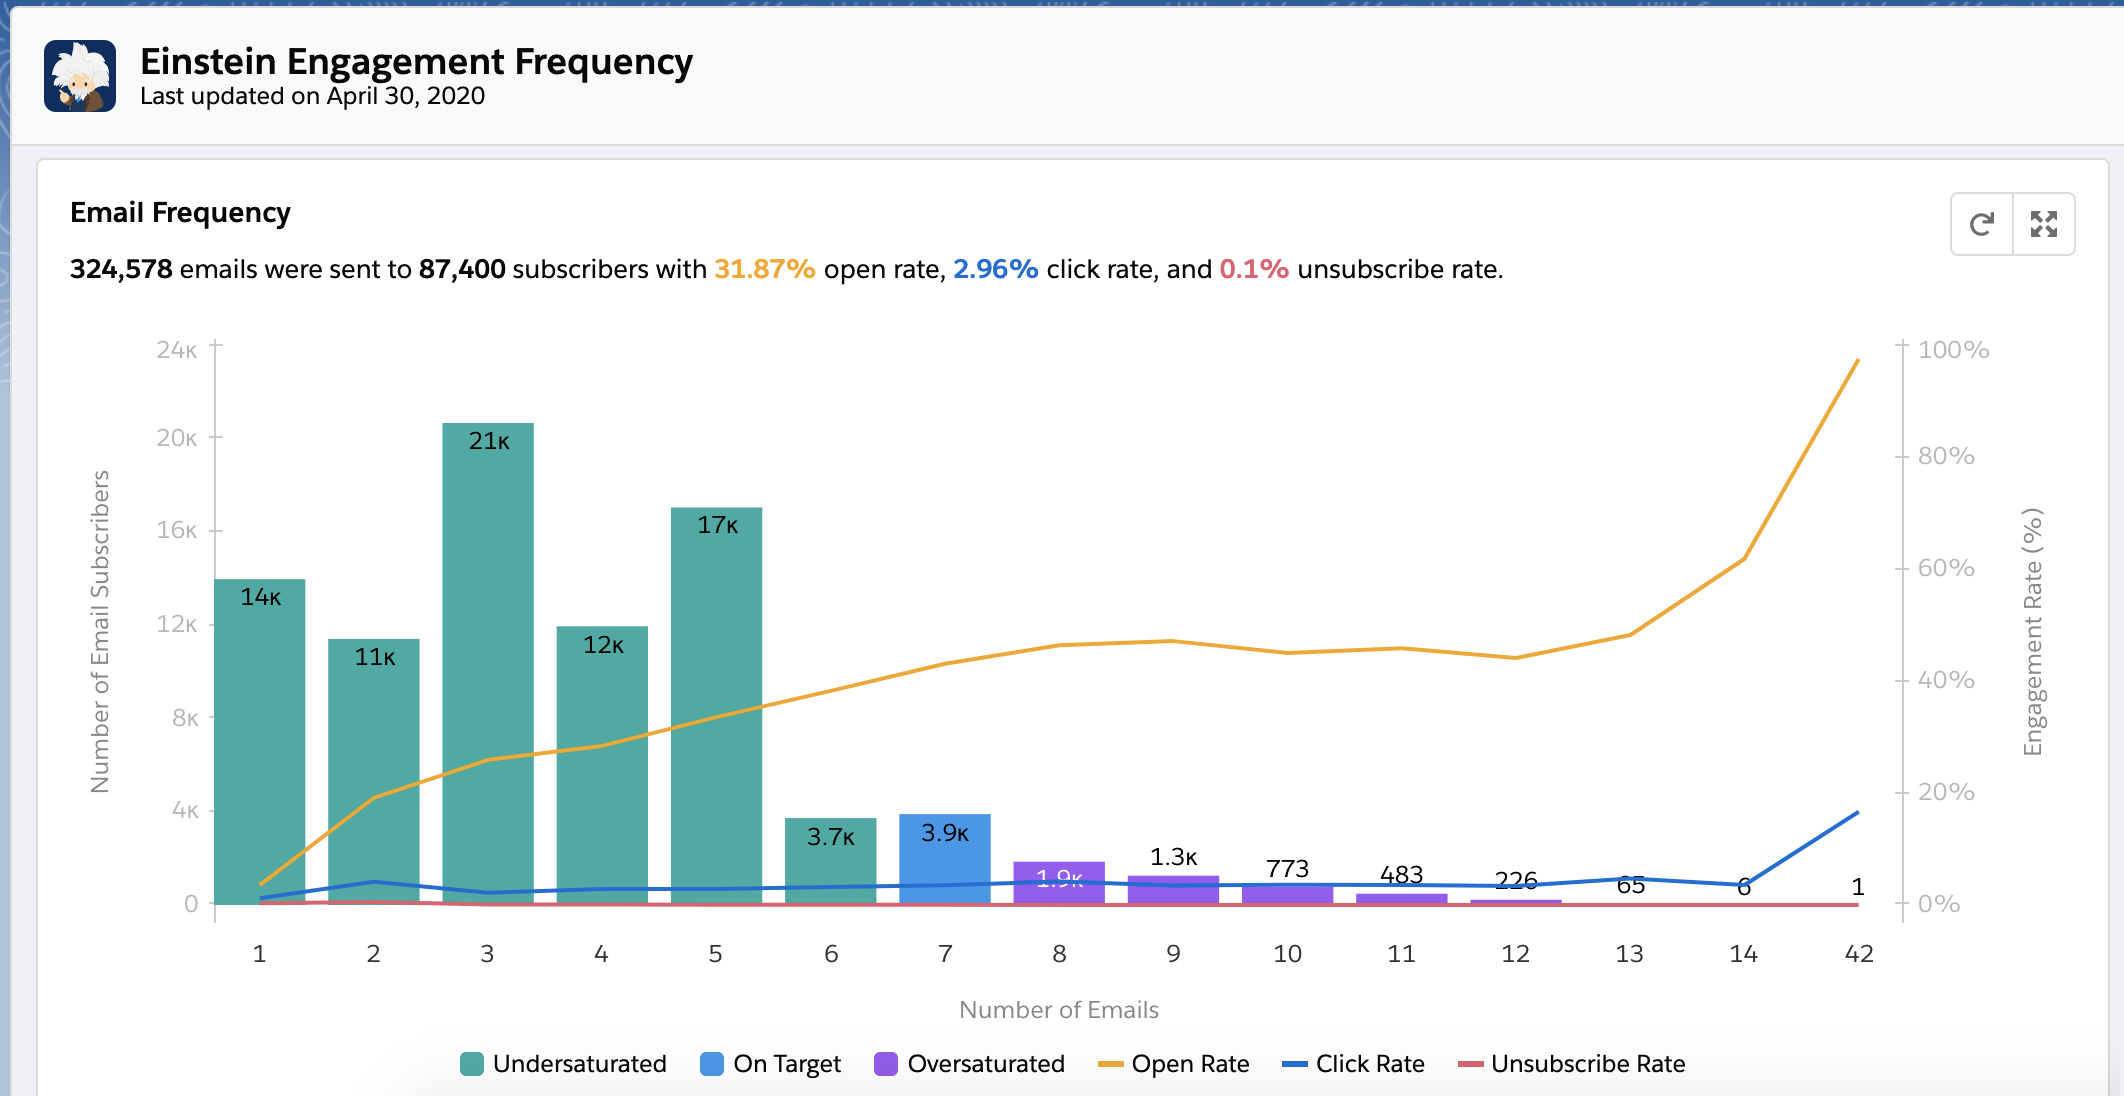 The above chart also shows ranges that identify the engagement of email subscribers.
- Green indicates undersaturated subscribers
- Blue indicates on-target engagement for subscribers
- Purple indicates oversaturated subscribers
Data Filters
You can configure the data filters for other options. By default, it is 90 days. The frequency chart varies based on the filters you apply here.
- Review 30, 60, or 90 days of dataEmail Type can be: Commercial, Transactional or AllOptimize the suggestions to consider open rate, click rate, or an advanced metric.

Create Data Extensions
You can create Data Extensions (DEs) based on Einstein Engagement Frequency suggestions. These data extensions contain information on subscribers that either received too few or too many email messages. Using these DEs, you can either exclude or include them in the future email sends and modify how many email messages those subscribers receive.
5. Einstein Copy Insights
Einstein Copy Insights analyzes the content from your Email Subject Lines to reveal insights. Use these copy insights to craft subject lines that drive stronger email engagement. Einstein analyzes these features and predicts how they contribute to the email message’s reach and the engagement it sparks.
Note that Einstein Copy Insights analyzes English language subject lines only.
Activation
To activate
- Navigate to Marketing Cloud Setup.
- Click Einstein.
- Click Einstein Copy Insights.
- Activate Einstein Copy Insights for your business unit
In the background, automation is created that moves data to the Marketing Cloud’s Einstein Platform to analyze the data.
Einstein Copy Insights Dashboard
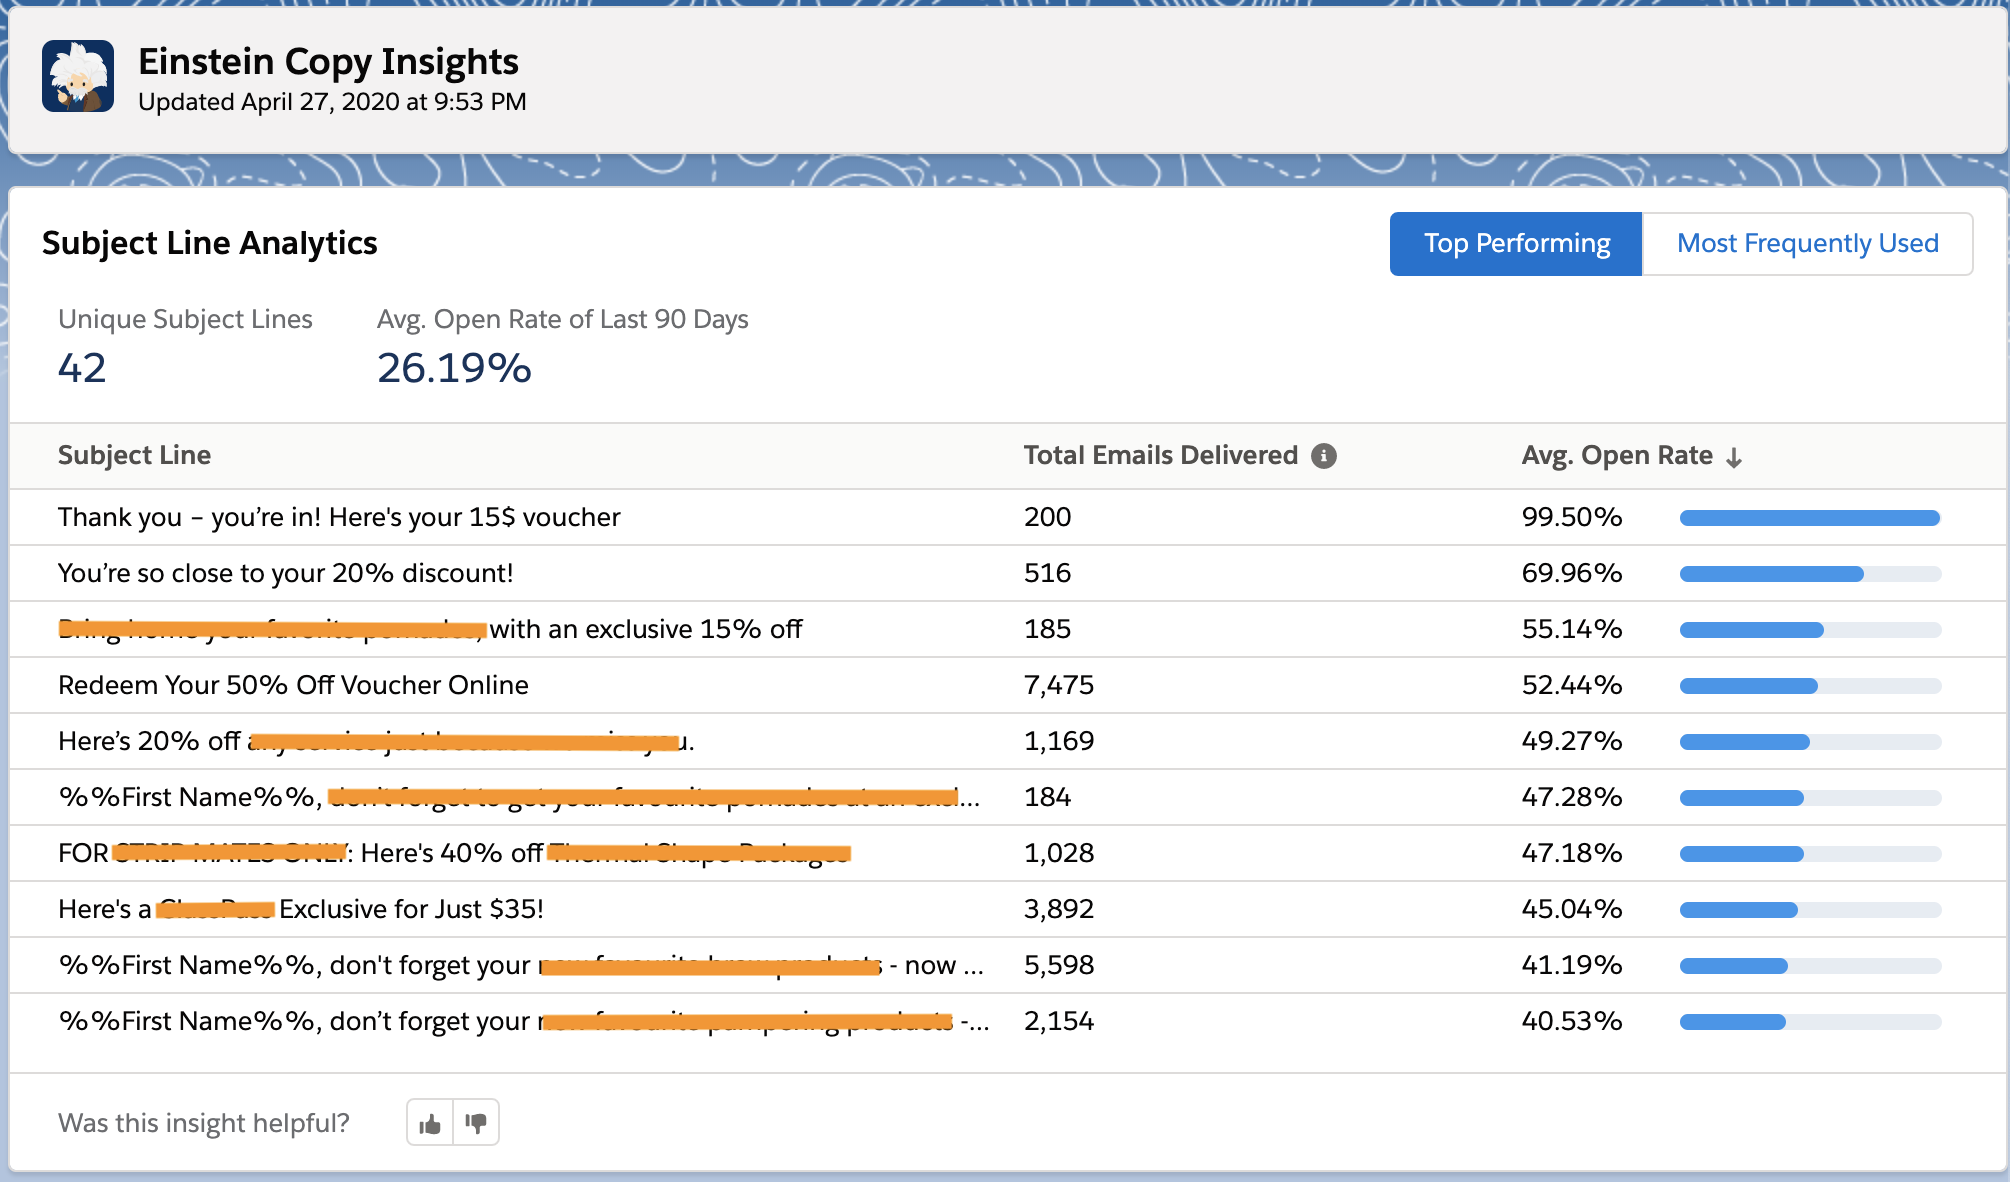
Use the Einstein Copy Insights dashboard to examine several factors relating to your emails’ subject lines.
- Subject Line Analytics shows the best performing subject lines based on open rate or the most frequently used subject lines by total emails delivered. To switch between views, click Top Performing or Most Frequently Used.
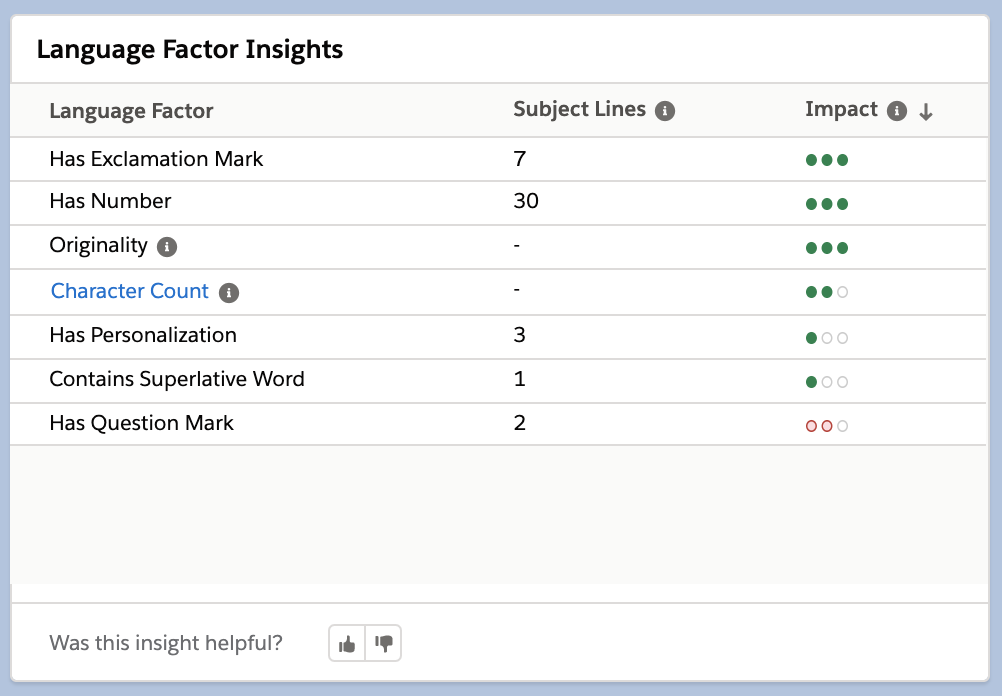
- Language Factor Insights: Use Language Factor Insights to find out which qualities in your subject lines are spurring engagement. These insights include an impact metric to show whether the factor has a positive or negative impact, and to what degree this factor impacts engagement.Note that factors that don’t influence your sends are not shown on the list.
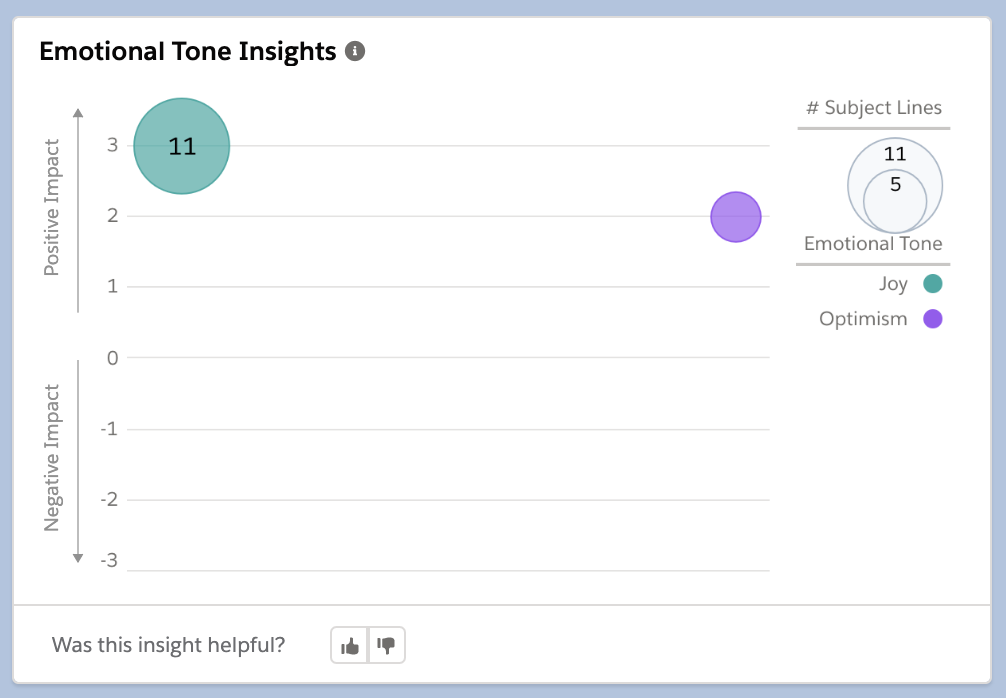
- Emotional Tone Insights measure the presence and impact of a subject line’s tone, as determined by Einstein. The size of each emotional tone’s circle represents the number of subject lines that include that tone.The emotional tone factor labeled FOMO refers to “fear of missing out.”
- Use Top Performing Phrases to understand which one-, two-, and three-word phrases in your subject lines make an impression on subscribers.When you select a two- or three-word phrase, only the words that appear consecutively in your subject lines appear.

- Most Frequently Used Phrases shows which commonly used phrases in your subject lines prompt engagement. It also shows whether that engagement is better or worse than the average open rate.

6. Einstein Content Selection
With Einstein’s help, send personalized content that is personalized for each customer when they open your messages. When you begin sending, Einstein selects the best asset for each customer’s emails from the assets and customer information you supply.
Activation
- To begin, navigate to Setup in the Marketing Cloud.
- Click Einstein.
- Click Einstein Content Selection.
- Click Activate.
- Click the dropdown list.Choose Subscriber Key or Subscriber ID (choose based on the unique identifier in data extension)
- To upload an image that appears when your assets aren’t available and no fallback images exist, click Upload Image.
- Add the URL that users are directed to when they click your contingency image in a message.
 Here are the steps in using Einstein Content Selection
- Create and Upload an Asset Catalog File: Give Einstein the images that can be selected as content assets in your messages. Provide an asset catalog .csv file that contains a URL and metadata for each content asset image file that Einstein can select.
Manage Einstein Content Selection Assets: The assets in your catalog file are the image assets that Einstein Content Selection chooses from. You can add an asset or import multiple assets here, in addition to editing attributes.
Enable an asset to make it available so Einstein Content Selection can select it for a message. Disable an asset when Einstein Content Selection can no longer select it.
Sync Your Consumer Profile Data Extension: If your organization has consumer or customer profile data that you want Einstein Content Selection to use when making selections, sync the sendable data extension that contains your customer profile data.
- In Einstein Content Selection Settings, click Sync Data Extension.Select the sendable data extension that includes your customer profile data. The field length limit is 100 characters.
- Click Save. When the sync completes, its status appears on the Settings page.
Set Up Content Selection Rules: If you want Einstein Content Selection to observe rules about what content to select, set content selection rules. A content selection rule governs when some assets can and can’t be selected and included in a message.
- If an attribute in your asset catalog is similar or related to attribute in your consumer profile data extension, you can connect them by mapping. Then, tell Einstein Content Selection if the attributes’ values must match exactly. Map only as many attributes as you want. Einstein still analyzes unmapped attributes to inform selections.

- If an attribute in your asset catalog is similar or related to attribute in your consumer profile data extension, you can connect them by mapping. Then, tell Einstein Content Selection if the attributes’ values must match exactly. Map only as many attributes as you want. Einstein still analyzes unmapped attributes to inform selections.
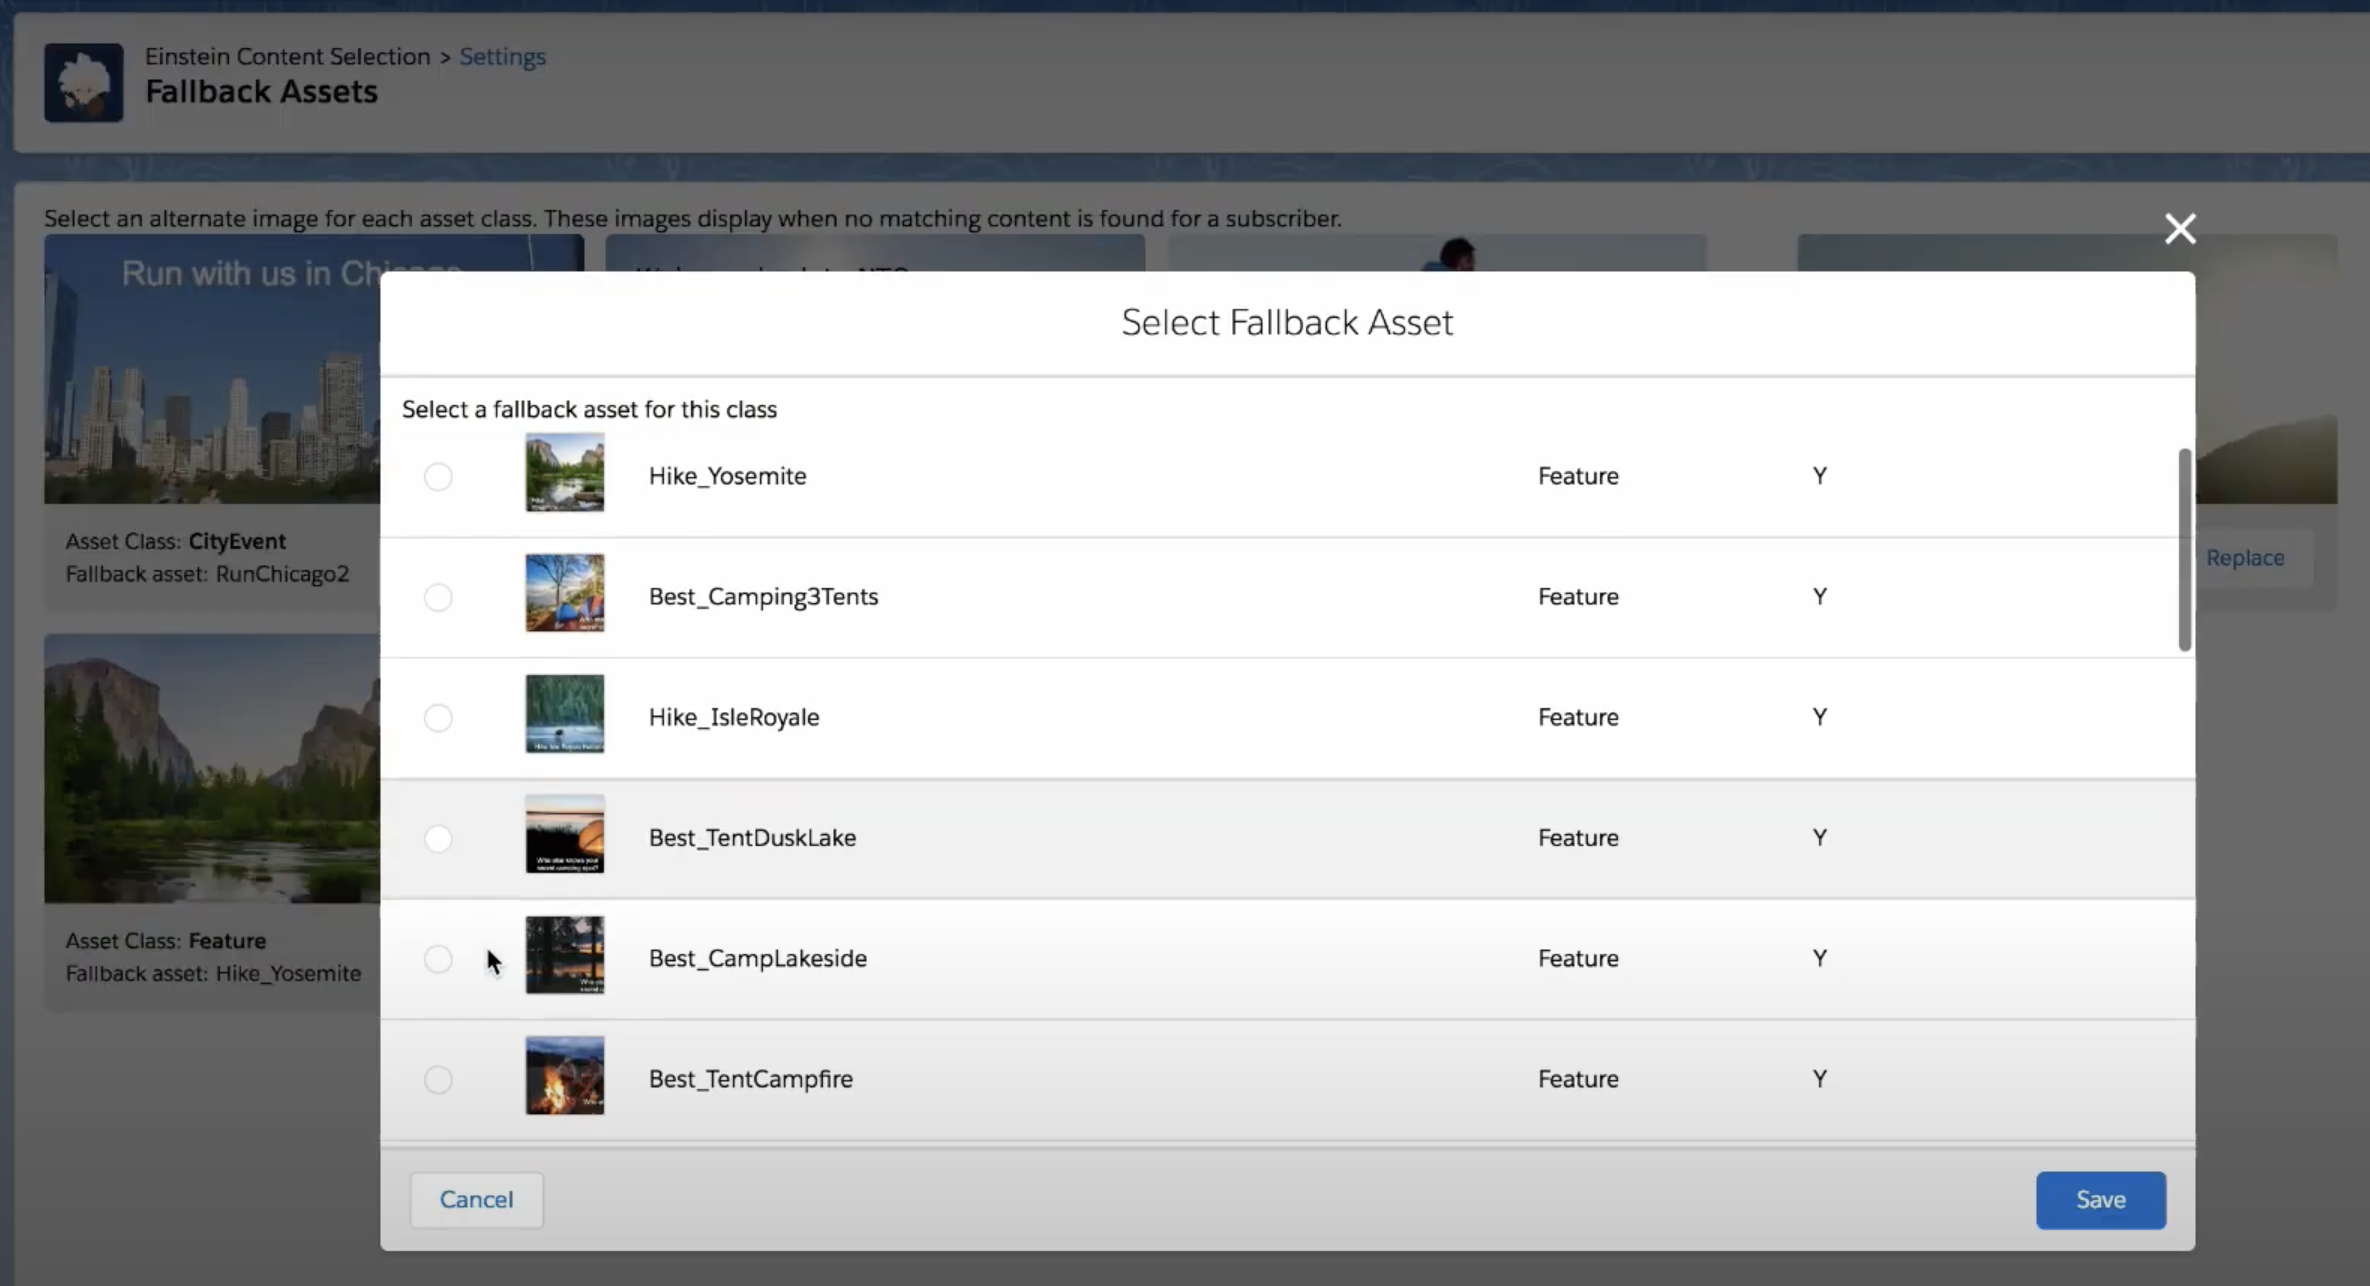
Set Fallback Assets: Choose an image asset that Einstein Content Selection displays when a matching asset can’t be found. Pick an image for each asset class in your asset catalog file. Even if your fallback assets are unavailable, Einstein Content Selection selects an image if possible
- Exclusion rules are conditions you set that tell Einstein Content Selection when not to select a particular type of asset for a subscriber.
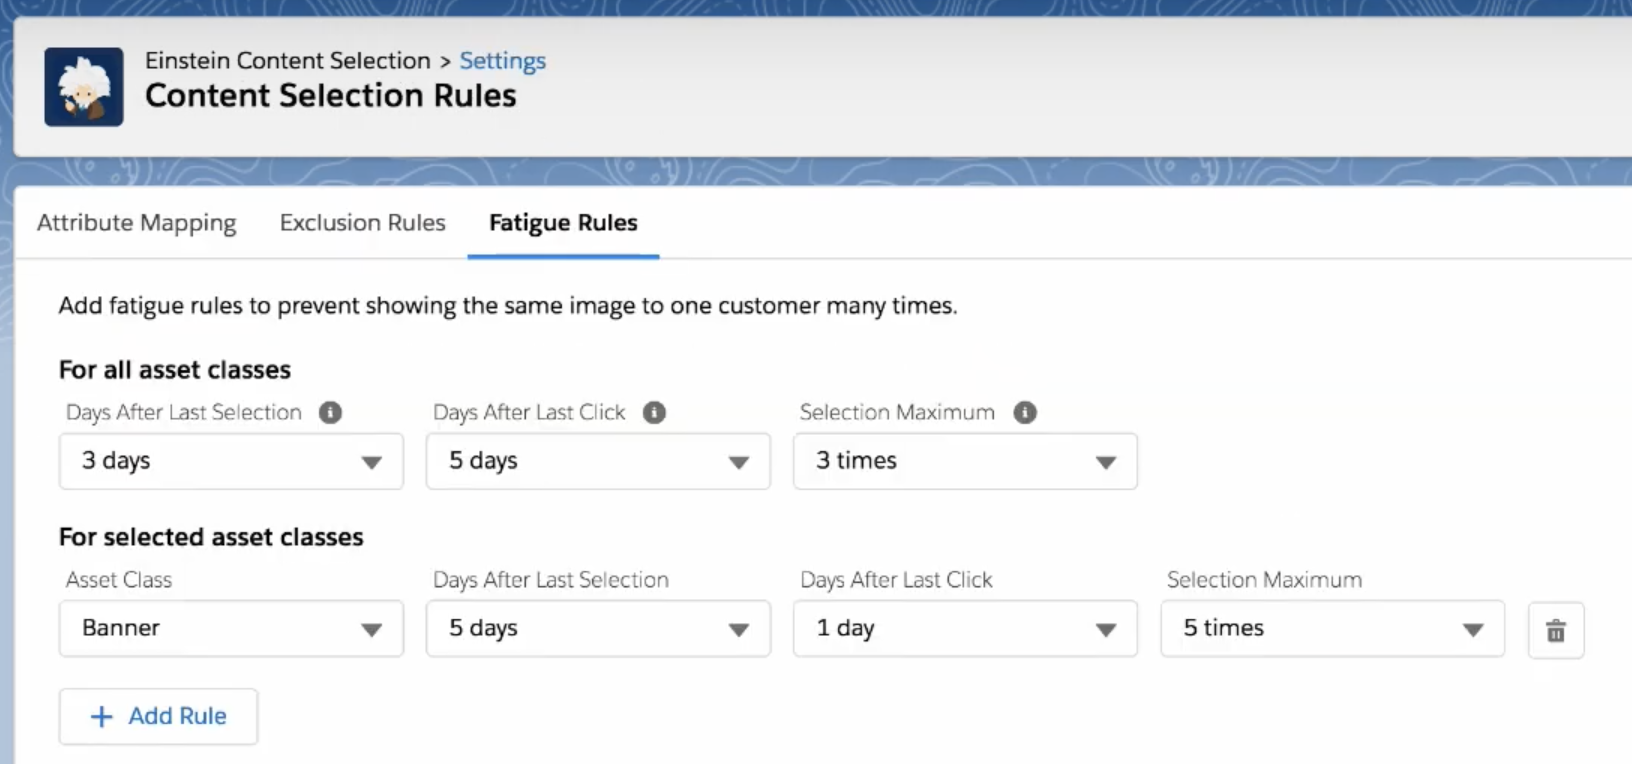
- Fatigue Rules Because assets that get clicks and generate engagement guide asset selection, Einstein Content Selection can select the same asset for the same customer more than once. Configure fatigue rules to prevent a customer from seeing the same image more often than you want them to.
Einstein Content Selection Performance Analytics
Using this dashboard you can find out which assets are performing well, view performance by asset class or by job, and view performance over time.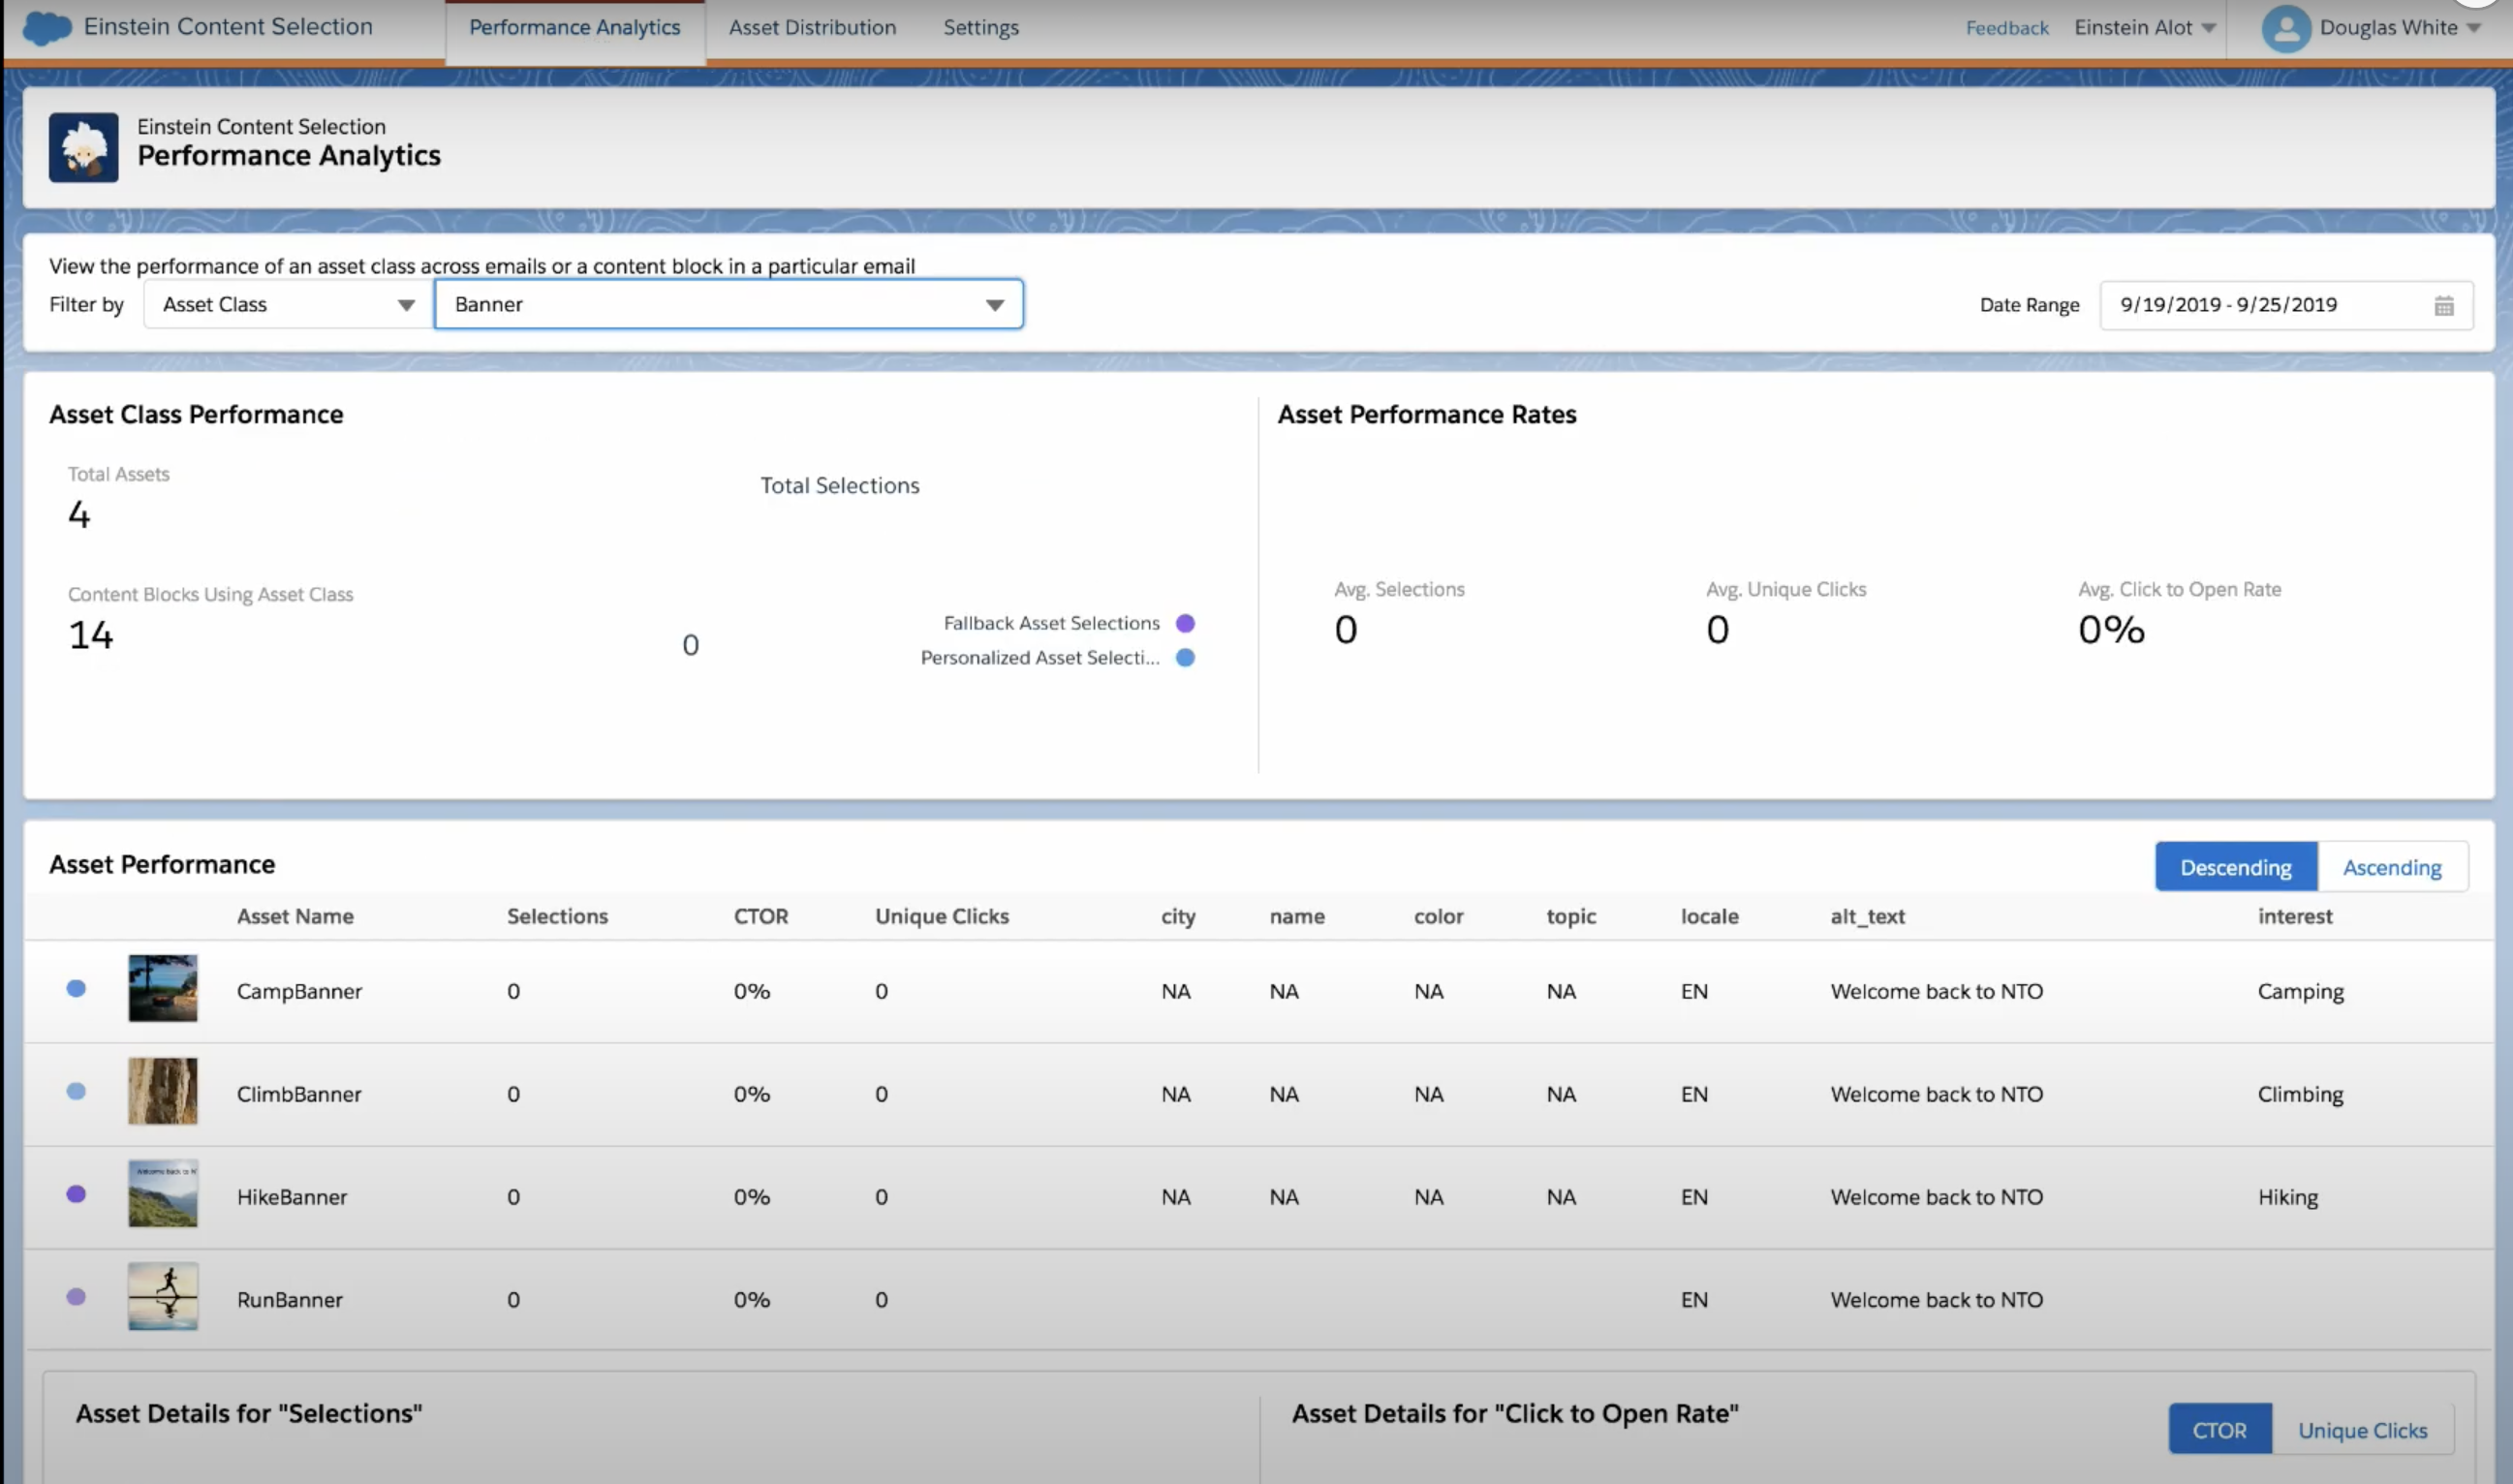

7. Einstein Email Recommendations
As the name suggests Einstein Email Recommendations deliver the next-best content or product by enabling you to observe customer behavior, build preference profiles.Email Recommendations are delivered as a pre-built image and link pair and are activated when a user opens the email. These are called as open time recommendations, meaning the logic and scenarios are processed immediately before they see the recommendation.
How it works:
- The image used in the recommendation is pre-built based on an HTML template that is used to style what one recommendation would look like.
- Each product or content recommendation is generated ahead of time and stored, to ensure that the image is instantly available.
- By pre-processing displays and logic for each product or content recommendation, we provide the most up-to-date recommendation without sacrificing performance when an email is opened.
- Each product or content recommendation is generated ahead of time and stored, to ensure that the image is instantly available.
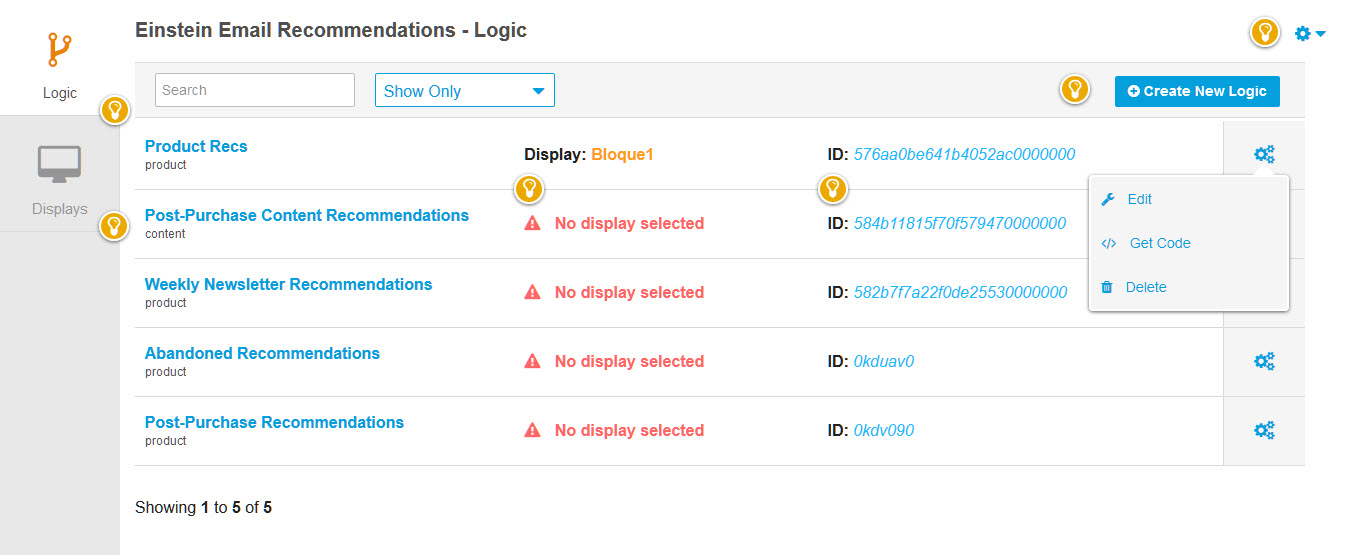
Einstein Email Recommendations Dashboard
The email recommendations dashboard in Einstein Recommendations displays a list of available recommendations.
It includes:
- the recommendation name
- the selected displaythe recommendation ID
- the gear icon
 Steps to configure Email Recommendations
- Step 1: Create Einstein Email Recommendations Content – to determine what content to include in the recommendation
- Step 2: Create Einstein Email Recommendations Logic. Create New or choose the standard logic
- Step 3: Configure the Einstein Email Recommendations Layout – select the number of columns and rows for the recommendations content. For example, to render in the columns with four rows, click the cell labeled 3X4.
- Step 4: Configure an Einstein Email Recommendations Scenario – the scenarios help you produce Einstein Recommendations for email or the web in Marketing Cloud. Refer to the Einstein Recommendation Scenarios.
- Step 5: Insert Einstein Email Recommendations Code – Copy and insert Einstein Email Recommendations code into your email.
Example
Here is the required HTML that would go in an email template for a block with one recommendation.
<a href="https://MID.recs.igodigital.com/rr/v2/HASH/l/1/%%emailaddr%%"> <img src="https://MID.recs.igodigital.com/rr/v2/HASH/i/1/%%emailaddr%%"> </a>Here’s the HTML to create the image used in this call.
<div style="font-size:12px;color:black;width:150px; text-align:center;"> <img style="max-width:150px;" src="%%ImageLink%%"> <p><b>%%ProductName%%</b></p> %%[ if SalePrice < RegularPrice then ]%% <s>Regular Price: %%RegularPrice%%</s><br> <span style="color:red;">Sale Price: %%SalePrice%%</span> %%[ else ]%% %%RegularPrice%% %%[ endif ]%% <p>%%Description%%</p> </div>Note: Each recommendation is an individual image, so if you needed four recommendations in a call, the HTML would include four image and link pairs.
8. Einstein Web Recommendations
Einstein Web Recommendations are similar to Email recommendations except that these recommendations are delivered on the website, the next-best personalized recommendation to each website visitor. Use Marketing Cloud Einstein Recommendations to create product or content recommendations to display on your website. Web Recommendations are delivered in two ways, via a JSON response or HTML/JS. The JSON response is the best practice delivery method. The JSON method is the most flexible and allows the website team to style and utilize the recommendation data in any way.
Einstein Web Recommendation Dashboard
The dashboard is the first screen when you open Einstein Web Recommendations which displays a list of available recommendations.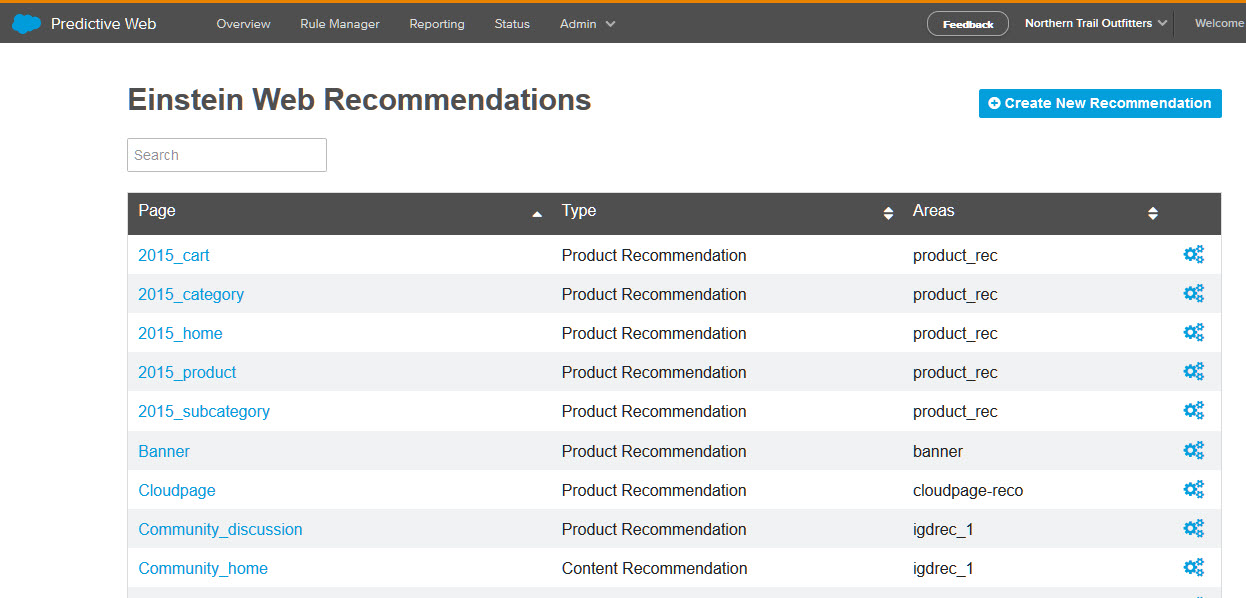 Steps to configure Web Recommendations
- Step 1: Set the Location and Type of Web Recommendation – select the Page or create new page where you would like the recommendations to appear.
- Step 2: Create the Einstein Web Recommendations Content Area – Select and configure the content to include in your web recommendations.
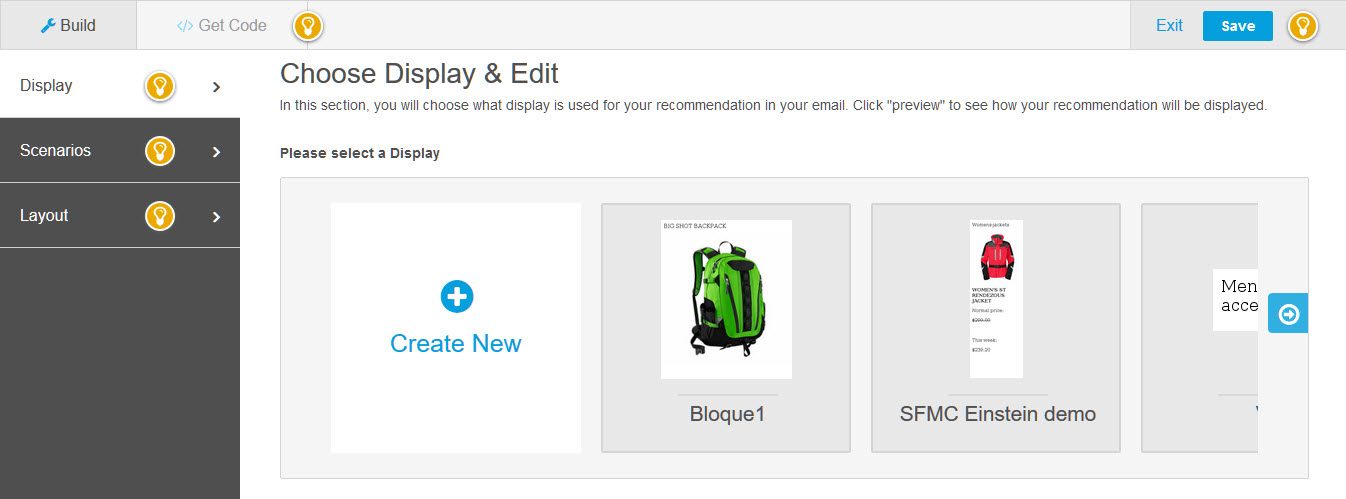
- Step 3: Configure the Web Recommendations Display Format – the format of how your recommendations appear on your website.
- Step 4: Configure the Einstein Web Recommendations Scenario – the scenarios help you produce Einstein Recommendations for email or the web in Marketing Cloud Refer to the Einstein Recommendation Scenarios.
- Step 5: Preview and Insert Einstein Web Recommendations
9. Einstein Content Tagging
Einstein Content Tagging automatically applies “searchable tags” to image files in your Marketing Cloud account. This helps in searching the images easy. A prefix that you configure is added to each Einstein tag to distinguish them from tags added by users.
Setup
- In the Marketing Cloud Setup app, expand Einstein and click Einstein Content Tagging.
- Click Configure.
- Enter the number of tags per image (Max:25)
- Enter an alphanumeric prefix for the tag
- Einstein tag is to distinguish them from tags added by users
- Select the confidence level between 0.5 (lowest) and 1.0 (highest).
- Use a higher confidence level to improve the accuracy of the tags applied to your images.
- Use a lower confidence level to broaden the scope of tags included.
- Select the language.Click Save.
- Turn on automatic tagging.
Things to note
- Einstein can add up to a maximum of 25 tags per image. (Configured in setup).Einstein tags existing JPG, JPEG, and PNG files that are 10 MB or less.
- Einstein analyzes and tags new images once every 24 hours.
- This feature uses Google Vision to analyze and process image files
- The Delete Tags option appears only after you turn off Einstein Content Tagging.
Summary
The Einstein features are a great way to get insights into your customer engagement and data. It is easy too as activation is only using a few clicks and the hard stuff is handled by Einstein and presented to you.

This is great article. I am new to SFMC however your blog made Einstein features so easy to understand.
LikeLike
Thank you! Glad to hear that.
LikeLike
Great article, thanks for sharing this great information with us please check Growthnatives for the Best Features From Salesforce Summer ’21 Release
LikeLike
Thank you. I was trying to start a similar kind of guide because is very difficult to follow each new Einstein product.
LikeLiked by 1 person
Hope this is helpful and covers the details
LikeLike