In this blog post, I’d be discussing the different ways to lock a Salesforce record in UI. By lock, I mean, the user shouldn’t be able to edit the field values of the record. I have identified 7 ways to lock a record using configuration and coding.
There is a general requirement that the Business doesn’t want any user to edit any fields of an Opportunity record when it is in ‘Finalization’ stage or ‘Deal Closing’ stage or even when the opportunity is ‘Closed Won’. Not just opportunity, it could be any object (standard/custom) sometimes the business doesn’t want user to edit a record when it is in a certain stage of the sales/business process.
There is no “best” approach among these 7, each approach has its own pros and cons. The approach you choose purely depends on what suits your requirement. I will highlight the pros and cons for each of these approaches, so that it helps you to make a smarter decision.
1. Record Types & Workflow/Process Builder
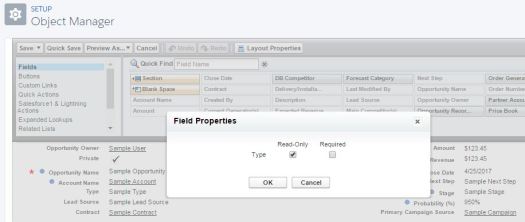
In this approach, you need to create 2 page layouts. I’m calling them – “EditablePageLayout” and “ReadOnlyPageLayout”. The editable page layout is the existing normal page layout you already have. The read only page layout will have all the fields in read-only mode i.e., for every field in this page layout, you have to click the settings icon and check the ‘Read Only’ check box as shown below.
Once you have the page layouts ready, create 2 record types and assign the page layouts to the record types.
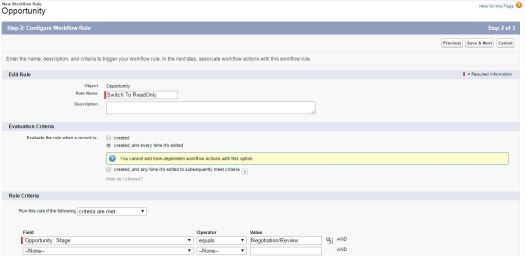
Now create a workflow rule – when opportunity stage is in “Negotiation/Review”, we need to change the page layout from EditablePageLayout to ReadOnlyLayout. To change the pagelayout, we need to change the record type for that record using workflow. Here’s how the workflow looks like.
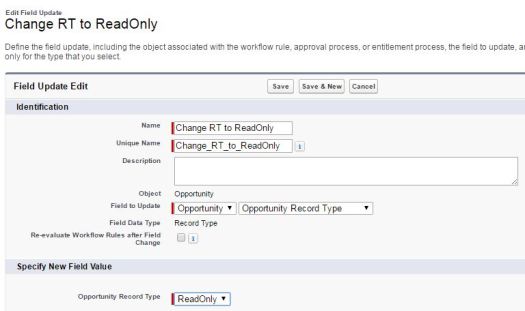
And then create a workflow field update to set the Record type.
That’s it, save the workflow field update and activate the workflow. When the opportunity is moved to ‘Negotiation/Review’ stage, the page layout changes to ReadOnlyPagelayout and the users cannot edit it anymore.
Note: With the 1st approach, every time user creates a new Opportunity, the user is asked to choose the record type! To skip this, you just have to remove the ReadOnly Record Type from the user’s Profile (and set the main record type as default). Even without record type permission, the user will still be able to view the Readonly record. Also, System Administrator would be still able to edit the record.
Tip : Instead of a workflow, you can of course use Process Builder to implement the logic for switching of record types from Editable to Read Only.
2. Record Types & Trigger
This approach is exactly same as the 1st one except that instead of workflow, we use a Trigger. You have to create 2 page layouts, 2 record types as mentioned in the 1st one. Except for the workflow, the change of RecordType logic is implemented in an Apex trigger.
Here’s the trigger code to change RecordType for the opportunity.
This file contains hidden or bidirectional Unicode text that may be interpreted or compiled differently than what appears below. To review, open the file in an editor that reveals hidden Unicode characters.
Learn more about bidirectional Unicode characters
| trigger OppTrigger on Opportunity (after insert, before update) { | |
| Map<String, Id> typeMap = New Map<ID,RecordType>(); | |
| for(RecordType rt: [Select ID, DeveloperName From RecordType Where sObjectType = 'Opportunity']) { | |
| typeMap.put(rt.DeveloperName, rt.id); | |
| } | |
| for (Opportunity opp : trigger.new) { | |
| // And the Agreement Category on the record = TEST | |
| if (opp.Stage__c == 'Negotiation/Review') { | |
| // Then automatically change the Record Type to ReadOnly RecordType | |
| opp.RecordTypeID = typeMap.get('ReadOnly'); | |
| } | |
| } | |
| } |
Note: The 2nd approach should be used only when you do not have an option to implement a workflow for any reason. If you are going with Record Types approach, it is strongly recommended to use Approach 1.
3. Without Record Types – Validation Rule
If you prefer to not use Record Types, then you can go with approach #3 OR #4.
In this approach, we will not use any page layouts, record types, workflows or process builder. This is simply by using a Validation Rule on Opportunity object. Here’s a validation rule that I created, which checks for the Negotiation Opportunity stage and if the fields Amount or Type are changed.
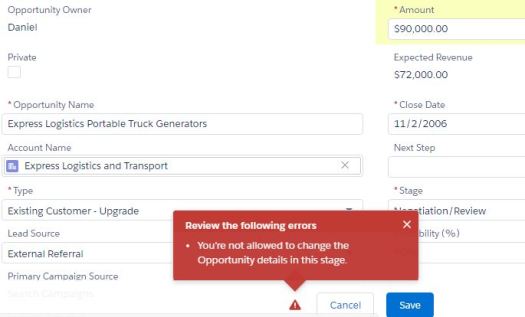
If any of these 2 fields are changed, the validation rule fires, gives an error message and it won’t allow the user to save the opportunity as shown below.
This is one way to lock the record but note that this in this example I just blocked Amount and Type fields only (mentioned in the validation rule). To block the entire record, you need to add all the ISCHANGED condition for all the fields in the validation rule.
With this approach, even System Administrator won’t be able to edit the record. You can specify for which Profiles this validation rule apply by mentioning the Profile Name in the validation Rule.
Disadvantage with this approach is that the error message is shown only when the user clicks on Save. The user will not know that the record is locked for editing until all the changes are made and clicks on Save.
Workaround for this disadvantage is to use an inline Visualforce page which shows the message – “Record Locked”. (Using apex outputText with rendered condition as the negotiation stage) so the users are aware that the record is locked. (Even if they edit and try to save the record, the validation rule will not allow to save!)
Note: There is no way to lock the entire record with Validation rule in a single statement. You have to check ISCHANGED condition for all the fields in the validation rule.
4. Without Record Types – Trigger
This approach is exactly same as the 3rd one except that instead of Validation rule, we use a Trigger. Only the validation rule check is done in the trigger. All the disadvantages mentioned for the 3rd approach apply here too.
Note: Ideally if you are not choosing approach 1 because you do not want to use Record Types, then you have to go with Approach 3 (Validation Rule). Only if you run out of limit of number of validation rules on an object, you should go with Approach 4.
5. Visualforce Page
This is a more tedious way to lock a record. You need to override the standard buttons Edit and View with a visualforce page. The visualforce page can use tag to replicate the entire page layout (and disable Edit buttons on the page) OR use individual tags for the fields to build the page from scratch. No user would be able to edit outputField values.
Note: The disadvantage with this approach is maintaining the VF page. If you’d want to add fields to the page layout, you need to edit the VF page and add the code for every new fields. Quite tedious!
6. Approval Process
Another way to lock a record is using Approval Process. The locking feature is a standard feature provided by Salesforce and the entire record will be locked. Well, the whole purpose of Approval Process isn’t about locking, it is about how records are approved in Salesforce. An approval process specifies each step of approval, including who to request approval from and what to do at each point of the process. We are just using an Action from the Approval Process.
So, how to lock a record using approval process? Simple, you just need to setup an Approval Process for an object and set the criteria for the record to enter the approval process (In our example, the criteria is Opportunity stage is ‘Negotiation’). Once you set the initial criteria, the Initial Submission Action will include Record Lock. That’s it.

You can set the record edit ability settings to ‘Administrators’ only OR currently assigned approver.
Note: Implementing the approval process, implies that the record needs to be approved by a user (configurable in the approval process). Even after the record is approved, you can set the record to remain in the Locked state if you prefer to do so OR unlock after approval.
7. Apex – Lock() and Unlock()
New lock() and unlock() methods in the System.Approval namespace let you lock records by passing in record IDs or sObjects. Previously, you could set approval-process locks and unlocks only through the Salesforce user interface.
To enable this feature, from Setup, enter Process Automation Settings in the Quick Find box, then click Process Automation Settings. Then, select Enable record locking and unlocking in Apex.
The new Approval.LockResult and Approval.UnlockResult classes let you interact with the results of your programmatic record locks and unlocks.
Example
This file contains hidden or bidirectional Unicode text that may be interpreted or compiled differently than what appears below. To review, open the file in an editor that reveals hidden Unicode characters.
Learn more about bidirectional Unicode characters
| // Query the accounts to lock | |
| Account[] accts = [SELECT Id from Account WHERE Name LIKE 'Acme%']; | |
| // Lock the accounts | |
| Approval.LockResult[] lrList = Approval.lock(accts, false); | |
| // Iterate through each returned result | |
| for(Approval.LockResult lr : lrList) { | |
| if (lr.isSuccess()) { | |
| // Operation was successful, so get the ID of the record that was processed | |
| System.debug('Successfully locked account with ID: ' + lr.getId()); | |
| } | |
| else { | |
| // Operation failed, so get all errors | |
| for(Database.Error err : lr.getErrors()) { | |
| System.debug('The following error has occurred.'); | |
| System.debug(err.getStatusCode() + ': ' + err.getMessage()); | |
| System.debug('Account fields that affected this error: ' + err.getFields()); | |
| } | |
| } | |
| } |
Note: Salesforce admins can edit locked records. Depending on your approval process configuration settings, an assigned approver can also edit locked records. Record locks and unlocks are treated as DML. They’re blocked before a callout, they count toward your DML limits, and if a failure occurs, they’re rolled back along with the rest of your transaction. To change this rollback behavior, use an allOrNone parameter.
That concludes the different ways to lock a record in Salesforce. Remember that this is not about “making the record invisible” to the user. The user should view the record, but shouldn’t have the permission to edit the record, so I haven’t considered “Sharing Settings” as an approach for locking records.
Do let me know in the comments section below if you can think of any other alternative way to lock a record in Salesforce!


Hai i tried to create a workflow rule for record type change using workflow rule by creating the another page layout by giving read access when the criteria met , but its not changing.Please suggest whats the issue
LikeLike
Found your post interesting to read. I cant wait to see your post soon. Good Luck with the upcoming update. This article is really very interesting and effective.
LikeLike
Hi, in my case I am trying to unlock Status field of task within task list view, not sure why I am unable to do it. I understand because I made it controlling field of a picklist, but having both fields on the page list view, it should be possible
LikeLike
Hi there! I tried following option 1 (workflow) to lock a quote record once the status is changed to Accepted, but when I get to the new field update page, I do not see an option to select the second read-only record type I created, as you have shown in the example for opportunity. Any help that will point me in the right direction would be greatly appreciated. Thanks!
LikeLiked by 1 person
You must assign the record type to your profile. You can go to Record Types in your object, click view assignments and then you can assign the record type to your profile.
LikeLike
Wowwww, awesome content bro , appreciate your work
LikeLiked by 1 person
Thank you, Emmanuel. 😊
LikeLike
Could you please tell me If I need to bypass or exclude some filed to be lock. Suppose my status is lock but I want that some filed should be editable.
LikeLike
If you use method 1, you can just choose which fields you set as read only, and leave the ones you want to be editable.
LikeLike
This is so helpful! I’ve been trying to figure out how to do this for a long time and have never seen it so simply and clearly explained! Thank you!!!
LikeLiked by 1 person
Thank you. Glad to know it is helpful
LikeLike
Hey Manish,
We have a requirement in our project – Once we created a Opportunity record by providing required field values,there will be a quick action button called “Send to XXXX”. When we clicked on “Send to XXXX” butto, the details will be sent out to other system. After we clicked on this button, we need to make few of the opportunity fields should be read-only.We are not using any VF page or component for this instead we were using standard opportunity page layout.
Would you please help out me on the same?
LikeLiked by 1 person
Hi Rajani,
The first method is the best solution for you – 1. Record Types & Workflow/Process Builder.
On the button click, you should change the Record Type (from normal to read-only page layout) as mentioned in it or make an update to a field to trigger the workflow/process builder (that switches the record-type).
LikeLike
But,when we click on “Submit to XXXX” button, we are supposed to send an details to some external system. How can we navigate to different record type when we click button? Since it has to do two things – One is it should send the details to third party system and record type should change.
LikeLike
Your option “Record Types & Page Layouts” is missing the disadvantage of mass editor updates. When using “Record Types & Page Layouts” to lock a record, it still allows you to edit fields in the record using Mass Editor in a list view. The only way this “locks” the record is for basic users who edit data on the record page. However, most of my users are power users and will quickly find the glitch of using Mass Editor. I just tested this in my Sandbox org and found this disadvantage.
How do you really lock down the entire record? In my testing, using “Record Types & Page Layouts” gives users a lock when they view the record but no locks when they try to edit using Mass Editor.
Please explain your use case disadvantage and how to overcome. Thank you.
LikeLike
3. Without Record Types – Validation Rule
What about if we changed the line:
ISPICKVAL(StageName, ‘Negotiation’) to
ISPICKVAL(PRIORVALUE(StageName), ‘Negotiation’)
and skip the rest.
This way anytime ‘StageName’ has ‘Negotiation’ value any changes (or no changes) will prohibit the record from saving.
This should work properly, right?
LikeLike
This will behave properly but the fields will not said to be “Read only”, the user will be able to type in new values and record will give error while saving.
LikeLike
One more solution is there for a locking record while using VF pages
solution is on Query we can use FOR UPDATE.
LikeLike
Hi Natalie. Let’s say in a trigger or an apex class, you write an “INSERT contact” statement. That is counted as 1 DML. UPDATE, DELETE, UPSERT, UNDELETE, MERGE are also few of the DML statements. Similarly, LOCK() and UNLOCK() are also considered as a DML statement.
Salesforce has a governor limit of 150 DMLs within 1 transaction. So, these 2 are also treated as DMLs and count towards that limit. Hope this helps.
LikeLike
Can you explain more of what this means:
“Record locks and unlocks are treated as DML. They’re blocked before a callout, they count toward your DML limits, and if a failure occurs, they’re rolled back along with the rest of your transaction. To change this rollback behavior, use an allOrNone parameter.”
LikeLiked by 1 person
Hi Natalie. Let’s say in a trigger or an apex class, you write an “INSERT contact” statement. That is counted as 1 DML. UPDATE, DELETE, UPSERT, UNDELETE, MERGE are also few of the DML statements. Similarly, LOCK() and UNLOCK() are also considered as a DML statement.
Salesforce has a governor limit of 150 DMLs within 1 transaction. So, these 2 are also treated as DMLs and count towards that limit. Hope this helps.
LikeLike
Realy nice post
LikeLike
Yay! Thank you 🙂
LikeLike
@sfdcFanBoy Thanks a lot your post. was really helpful. I used your first recommendation: 1. Record Types & Workflow. I just have one question, if I want to give the ability for editing to just one user what can I do? the user asked me this: “add a rule where the opportunity owners cannot make edits once the opportunity is Closed/Won. Because every time when the opportunity owner makes any edit, another case will be created! I’d like permissions to be able to edit if needed. Thanks! ”
Thanks!
LikeLike
In the workflow you need to add Profile check too. Only switch to ReadOnly pagelayout for certain profiles only. If no profile is mentioned, it applies to all Profiles.
LikeLike
What useful post! Thank you!
LikeLiked by 1 person
Glad it is helpful.
LikeLike
Can you do #1 with a custom object?
LikeLiked by 1 person
Yes all these work for standard and custom objects as well.
LikeLike
QUOTE:
Note: There is no way to lock the entire record with Validation rule in a single statement. You have to check ISCHANGED condition for all the fields in the validation rule.
SUGGESTION:
You can add the ISCHANGED condition on the LastModifiedDate instead to lock the entire record.
LikeLiked by 1 person
Right, I have mentioned that ISCHANGED needs to be added for all the fields in the page layout.
LastModifiedDate is a great suggestion. Thanks. I will add that too.
LikeLike